Thursday 21 October 2010

Adjusted nose and mouth again, created eyebrows and a briefly reviewed.

I have adjusted my nose and mouth again, make it smaller.
The eyebrows created in same ways that create eyelash and hair.

Summary
The head model seemed very like me at first blush. Of course, the progression of modeling had been refined again and again.

Wednesday 20 October 2010

Completed. look like me?~

It look like me~?

PS: Due to see my hair clearly, I have changed the background color to gray of render.

Monday 18 October 2010

My eyelash and hair

Eyelash
Selected line at the edge of the eyelid, click ‘Create Sharp from Selection’. Click it and chose Freeze unselection. Hold Shift to copy the line according the eyelash sharp.
Then attach that and adjusted the vertexes.
After that, divide the line and chose the Spline, used the ‘Cross Section’ to link these lines, then deleted.

Right click and chose ‘Smooth’ to make it look better.
The next works is Detach these Splines, and attached that sequential order. The sequence is most impotent.
Selected the ‘Hair and Fun’ from modifier list. Set the Root color is black, Tip color is dark gray. Finally, modify other parameters to refine the eyelash, as the count, rand scale and thick.

Hair
Hair created in same way that create eyelash.

Friday 15 October 2010

Eyeball created and UV mapping

Eyeball Created

Firstly, I have dragged a sphere on front view, hold on Shift and scale to copy small one. Tick the soft select and select the vertex in the top, move upward. Then, selected the small one, through circular selection region to select polygon in the top, detach and move the pivot to center to object, rotate 180 degree and make align. Then chose the Nomal from Modifer list. Drag the sphere with AutoGrid, and sunk down it.


Secondly, I have edited the material to eyeball. The eye white included transparent material and white material. The transparent need adjust the Specular Highlights and set Reflect/Refract on the Reflection. The iris has a glass texture map for color. The color I chose the brown and set the diffuse color to smaller. The Specular set wide highlight but not a sharp. And then, I have adjusted the texture UV angle. The Pupil had adjusted the Specular level and goodness.
Finally, grouped these parts, hold Shift to copy another one and mirrored.


UV Mapping

In this stage, I have expanded the UV three times. Obviously, I make getting better and better.
This is first Mapping

This is Second times 

The last Mapping

In fact, I have adjusted the model before mapping ever time. And now, my head model looks better. After that, I have mirrored and welded.

Then, I opened the UV in Photoshop. Follow the video, I have pasted my face according the UV. About the skin texture, I made the new layer to paint the color of ‘Blanched Almond’, set the opacity to 60% and chose the dissolve from Blend model. And then, create the new layer and print similar color merge layer with upon one. I think the color dark than my face, I create transparent layer and merge it.

Saturday 9 October 2010

My head have been done except Mapping

My ear!!
There are lots of troubles when I created my ear.
Firstly, I have made the face inside-out.

I tried the ‘Normal’ tool, but it really not good.
So I must make my ear again. It need more careful with adjust vertex.

Make my head
Next, I have make the ear and back of head to together.

My Head is Complete!!
I have smooth and adjust some vertex.
I have made the eyeball~ But it look like....uh....... in a word, I am prettier than in the model!!!


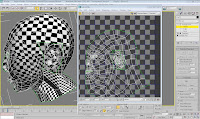
Actually, I have tried to mapping my head, but it really difficult.
The first time was failed. I am doing again…