Eyeball Created
Firstly, I have dragged a sphere on front view, hold on Shift and scale to copy small one. Tick the soft select and select the vertex in the top, move upward. Then, selected the small one, through circular selection region to select polygon in the top, detach and move the pivot to center to object, rotate 180 degree and make align. Then chose the Nomal from Modifer list. Drag the sphere with AutoGrid, and sunk down it.


Secondly, I have edited the material to eyeball. The eye white included transparent material and white material. The transparent need adjust the Specular Highlights and set Reflect/Refract on the Reflection. The iris has a glass texture map for color. The color I chose the brown and set the diffuse color to smaller. The Specular set wide highlight but not a sharp. And then, I have adjusted the texture UV angle. The Pupil had adjusted the Specular level and goodness.

Finally, grouped these parts, hold Shift to copy another one and mirrored.

UV Mapping
In this stage, I have expanded the UV three times. Obviously, I make getting better and better.
This is first Mapping

This is Second times 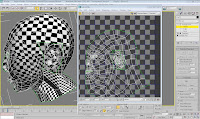
The last Mapping

In fact, I have adjusted the model before mapping ever time. And now, my head model looks better. After that, I have mirrored and welded.
Then, I opened the UV in Photoshop. Follow the video, I have pasted my face according the UV. About the skin texture, I made the new layer to paint the color of ‘Blanched Almond’, set the opacity to 60% and chose the dissolve from Blend model. And then, create the new layer and print similar color merge layer with upon one. I think the color dark than my face, I create transparent layer and merge it.


0 comments:
Post a Comment